1-11 チャート作成資料
(1)「乖離率」チャート作成マクロ例
グラフは自動記録でマクロを作成できるので、とくにテクニック的なものはなく誰でも簡単に
グラフプロシージャを組むことが出来ます。
しかし、VBA高級者でも自分の期待した通りのグラフにするには、何回も自動記録をし最初に
記録したロシージャの修正が必要となります。
グラフに関するプロパティやメソッドの引数の資料があれば短時間でマクロを作成できるので、
その資料を作成しました。
'シート名
shname = ActiveSheet.Name 'シート名取得
yasune = Cells(1, 11) ’セルCells(1, 11)の安値を変数(yasune)へ代入
'グラフデータ指定 '[1]
Set myrange = Union(Range(Cells(3, 1), Cells(60, 1)), _
Range(Cells(3, 6), Cells(60, 6)), _
Range(Cells(3, 9), Cells(60, 10)))
'グラフ表示場所
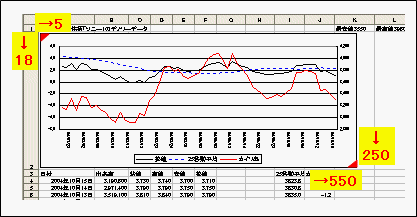
ActiveSheet.ChartObjects.Add(5, 18, 550, 250).Select '[2]
ActiveChart.ChartType = xlLineMarkers '[3]
ActiveChart.SetSourceData Source:=myrange, PlotBy:=xlColumns '[4]
ActiveChart.Location Where:=xlLocationAsObject, Name:=shname '[5]
'軸→項目(データあり表示) '[6]
ActiveChart.Axes(xlCategory, xlPrimary).CategoryType = xlCategoryScale
'第2軸の設定 '[7]
ActiveChart.PlotArea.Select
ActiveChart.SeriesCollection(3).Select
ActiveChart.SeriesCollection(3).AxisGroup = 2
'左目盛の文字調整 '[8]
With ActiveChart.Axes(xlValue)
.TickLabels.Font.Size = 8
If .MaximumScale < 1001 Then
.MinimumScale = Int(Int(yasune * 0.8) / 10) * 10
Else
.MinimumScale = Int(Int(yasune * 0.8) / 100) * 100
End If
End With
'右目盛の文字調整 '[9]
With ActiveChart.Axes(xlValue, xlSecondary)
.TickLabels.Font.Size = 8
End With
'下目盛の文字調整 '[10]
With ActiveChart.Axes(xlCategory).TickLabels
.Font.Size = 8
.NumberFormatLocal = "yy/mm/dd"
.Orientation = xlDownward
End With
'日付を逆にする '[10-1]
With ActiveChart.Axes(xlCategory)
.CrossesAt = 1
.TickLabelSpacing = 2
.TickMarkSpacing = 1
.AxisBetweenCategories = True
.ReversePlotOrder = True
End With
'プロットアリアの色 '[11]
ActiveChart.PlotArea.Interior.ColorIndex = 2
'ボン例位置
ActiveChart.Legend.Position = xlBottom '[12]
'グラフ線の装飾 '[13]
With ActiveChart.SeriesCollection(1)
.Border.ColorIndex = 1
.Border.Weight = xlThick
.Border.LineStyle = xlContinuous
.MarkerStyle = xlNone
End With
[1]グラフデータ指定
Set myrange = Union(Range(Cells(3, 1), Cells(60, 1)), _
Range(Cells(3, 6), Cells(60, 6)), _
Range(Cells(3, 9), Cells(60, 10)))
[1] 下図のAFIJ列を選択した例。
[2] Unionメソッドでセル範囲を集合させることができるので、Range()を追加・削除で修正できます。

[3] 上記は列が離れている場合ですが、連続したセル(例:HIJ列)指定は下記でよい
Set rangch =Range(Cells(3, 8), Cells(60, 10)))
[2] 新しいチャートを作成
ActiveSheet.ChartObjects.Add(5, 18, 550, 250).Select
[1] ChartObjects.Add メソッドで、新しいチャートを作成
[2] 作成する場所の指定方法(5, 18, 550, 250)は下図参照
[3] グラフの種類を指定
ActiveChart.ChartType = xlLineMarkers
下図は通常のグラフ作成で表示されるウィダードですが、VBAチャート名は下記の通りです
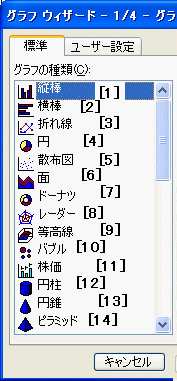 [1]ActiveChart.ChartType = xlColumnClustered '縦棒
[2]ActiveChart.ChartType = xlBarClustered ’横棒
[3]ActiveChart.ChartType = xlLineMarkers ’折れ線
[4]ActiveChart.ChartType = xlPie '円
[5]ActiveChart.ChartType = xlXYScatter ’散布図
[6]ActiveChart.ChartType = xlAreaStacked ’面
[7]ActiveChart.ChartType = xlDoughnut ’ドーナツ
[8]ActiveChart.ChartType = xlRadarMarkers ’レーダー
[9]ActiveChart.ChartType = xlSurface ’等高線
[10]ActiveChart.ChartType = xlBubble ’バルブ
[11]ActiveChart.ChartType = xlStockVOHLC ’株価
[12]ActiveChart.ChartType = xlCylinderColClustered ’円柱
[13]ActiveChart.ChartType = xlConeColClustered ’円錐
[14]ActiveChart.ChartType = xlPyramidColClustered ’ピラミット
[4]グラフのソースデータ範囲指定
ActiveChart.SetSourceData Source:=myrange, PlotBy:=xlColumns
[1] Source:=myrange → [1]のSetステートメントで指定した(myrange)を参照
[2] PlotBy:=xlColumns → グラフのデータ系列が、列か行かを指定
・xlColumns(列を使用)、xlRows(行を使用)
[5]グラフを新しい位置に移動
ActiveChart.Location Where:=xlLocationAsObject, Name:=shname
[1] Where:=xlLocationAsObject の場合は、 Name:=でグラフを貼るシート名指定
(本例の変数(shname)には、事前に貼るシート名を入れてあります)
[2] Where:=xlLocationAsNewSheet の場合は、 Name:=で新しいシート名指定
[6]項目軸の種類を設定
ActiveChart.Axes(xlCategory, xlPrimary).CategoryType = xlCategoryScale
① 軸の種類は自動記録では「グラフオプション」で指定できます(下図参照)
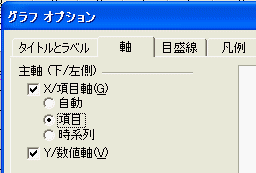
② 自動→ ActiveChart.Axes(xlCategory, xlPrimary).CategoryType = xlAutomatic
③ 時系列→ActiveChart.Axes(xlCategory, xlPrimary).CategoryType = xlTimeScale
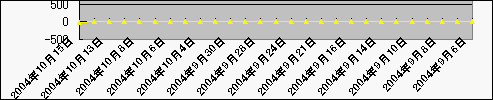
本例のように軸が日付形式の場合、「自動」または「時系列」を指定の場合は、下図のように
グラフデータに無い土曜日・日曜日も勝手に項目を作りグラフ化されます。
(全然便利と思わないがExcel内蔵の基本機能)

④項目→ActiveChart.Axes(xlCategory, xlPrimary).CategoryType = xlCategoryScale
項目を指定した場合は、下図のように実際にあるデータのみがグラフになります
[7] 第2軸の設定
ActiveChart.PlotArea.Select
    ActiveChart.SeriesCollection(3).Select
    ActiveChart.SeriesCollection(3).AxisGroup = 2
① 第2軸を設定したい系列を選択し(本例では系列3の乖離率)ダブルクリックで、
下図の書式設定のダイアログが表示されるので、第2軸指定で自動記録できます

【戻る】 【Top画面】
【HPへ】